---
title: How to propagate a Pro/ENGINEER attribute using Oracle’s Engineering Collaboration
description: Most Oracle customers, who purchase Oracle’s Engineering Collaboration (EC) product to interface Pro/Engineer (Pro/E) to Agile PLM, get services bundled with it so the initial product deployment meets their needs. What happens down the road though if you need to need a new standard parameter to be viewable in Agile?
image: http://zerowait-state.com/wp-content/uploads/2010/01/p2a_migrate.jpg
---
[](https://www.zerowait-state.com/home)
** [Contact ZWS Executive](https://zerowait-state-1744353.hs-sites.com/contact-zws-executive)
Search
** [Contact ZWS Executive](https://www.zerowait-state.com/contact-zws-executive/)
Search
# THE PLM STATE
# How to propagate a Pro/ENGINEER attribute using Oracle’s Engineering Collaboration
Most Oracle customers, who purchase Oracle’s Engineering Collaboration (EC) product to interface Pro/Engineer (Pro/E) to Agile PLM, get services bundled with it so the initial product deployment meets their needs. What happens down the road though if you need to need a new standard parameter to be viewable in Agile?
This article will outline the basics involved in transferring a Pro/E parameter to Agile PLM for design objects. We have written some pretty elaborate scripts to dynamically change configurations based on the engineer’s desire to connect to a test or the “production” system. This blog cannot address every customization scenario, so be advised that this is targeted for the typical, out of the box installation.
It is strongly suggest that you backup the Agile EC working directory prior to making changes; one can never be too cautious, especially when it comes to a sophisticated product such as EC.
# Do Your Homework
## Get EC Parameters from CAXClient.xml
Locate your CAXClient_Designs.xml file in acpjaragile9. Be advised that some installations are customized so the name of the XML file may be different. It might also be named CAXClient.xml. Open the file in a text editor and note the values for the following properties:
This could also be , depending on your implementation. The process is similar except that you will be working in the DOCUMENT location of this file instead of FILEFOLDER.
## Get the design object attribute
For this example, the attribute you see below was created. It was done by opening the Agile Java client on the admin tab and taking the following steps. Using the DOCUMENT object rather than FILEFOLDER dictates the object to modify/evaluate:
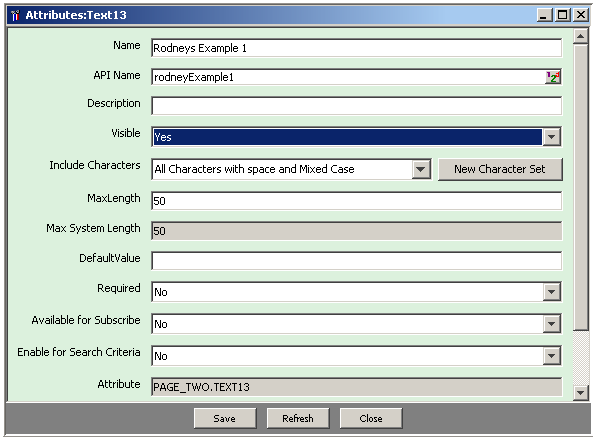
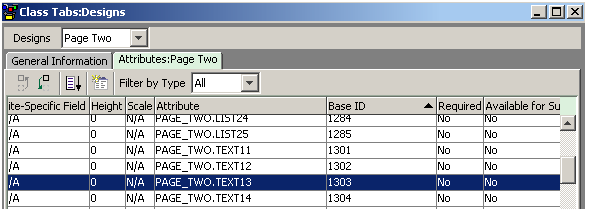
- Get the base ID for the object (Page_Two.Text13 i.e. 1303)
# Configure the Engineering Collaboration client
## CAXClient XML
It is now time to add the property to CAXClient_Designs.xml:
```
<table name="PAGE_TWO" id="0">
<!-- internal CAX field mapping -->
<attribute name="CAX_CRE_SYSTEM" id="2007" set="0" get="1" />
<attribute name="CAX_FIL_NAME" id="2017" set="1" get="1" />
<attribute name="CAX_TYPE" id="2009" set="0" get="1" />
<attribute name="CAX_SUBTYPE" id="2010" set="0" get="1" />
<attribute name="CAX_MODEL_TYPE" id="1332" set="1" get="1" />
<attribute name="CAX_MODEL_REF" id="1333" set="1" get="1" />
<attribute name="CAX_VAR" id="2012" set="0" get="1" />
<attribute name="CAX_LINK_TYPE" id="1334" set="1" get="1" />
<attribute name="CAX_LINK_REF" id="1335" set="1" get="1" />
</table>
```
1. Add
The id value came from step 7 above. Defining set will allow you to update the value on interactive save.
2. Save and close CAXClient.xml
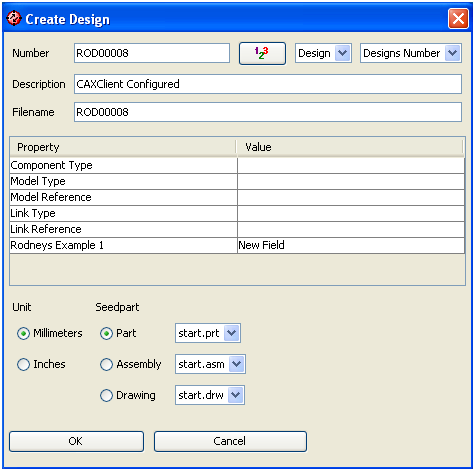
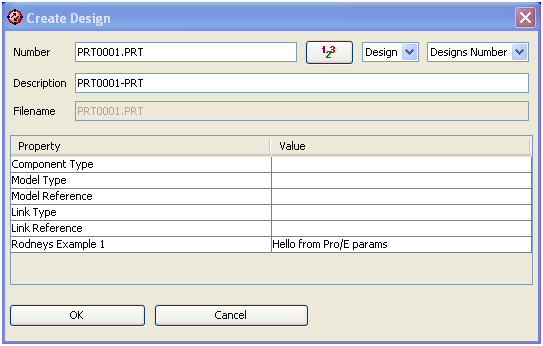
3. Re-launch EC, and select Agile New, you will see the example attribute shown at the bottom of the property list. The label displayed will actually be the text pulled from the Agile configuration for that object id. RODNEY_EXAMPLE is just a configuration reference.
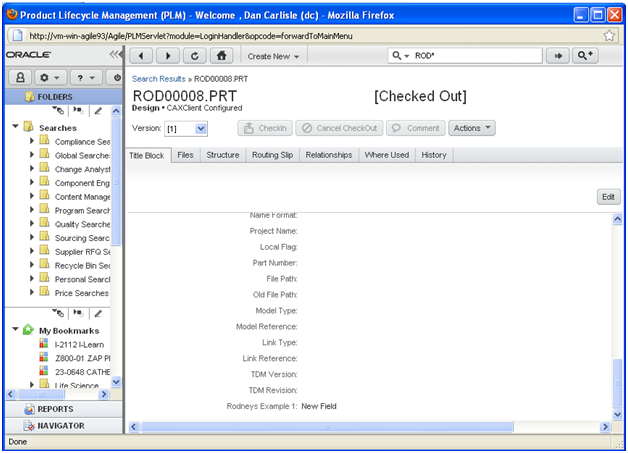
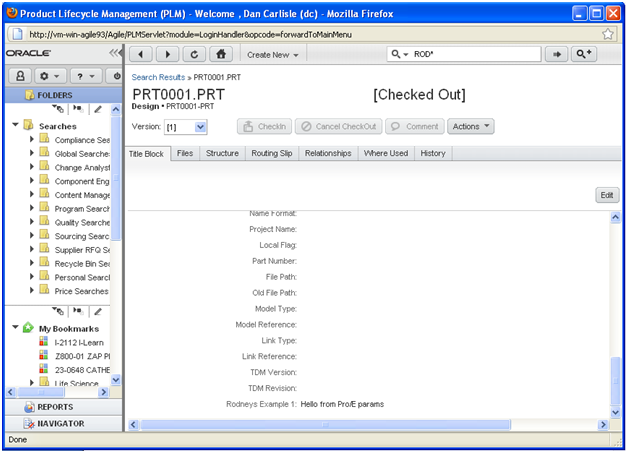
At this point, the attribute value has been propagated to Agile.
## AcpCustimer Configuration Settings
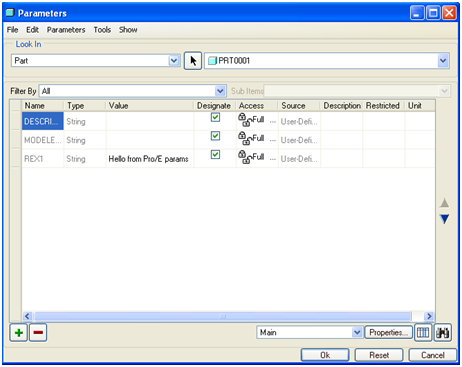
The topic of the blog was Pro/E to Agile, not interactive save to Agile though, so let’s do some more work. Modify the AcpCustomer9.ini file
```
[ ProEToAgile.Create_DOCUMENT ]
#
CAX_TYPE = Std.ObjectType.ToUpper
CAX_NEW_NUMBER = Std.ObjectName.Type.ToUpper
CAX_CRE_SYSTEM = Std.CreSystem.None
DESCRIPTION = Std.ObjectName-Type.ToUpper
DESCRIPTION = Par.DESCRIPTION.ToUpper
CAX_TIMESTAMP = Std.VerStamp.None
CAX_LINK_TYPE = Std.ReferenceType.ToUpper
CAX_LINK_REF = Std.ReferenceModel.Range-0-180
CAX_MODEL_TYPE = Std.FamilyType.ToUpper
CAX_MODEL_REF = Std.FamilyModel.Range-0-180
```
```
RODNEY_EXAMPLE = Par.REX1.None
```
# Summary
Saving Pro/Engineer parameters isn’t terribly difficult once you get the hang of it. Just may sure you back everything up before you start changing your settings.
You may need to modify the privileges for the Design Engineer role for new fields; check with your Agile administrator if that is outside your comfort zone. [clear-line]
If you like this post, Please Share!
- [Tweet](https://twitter.com/share)
### Subscribe to the ZWS Blog
### Recent Posts
© 2024 Zero Wait-State • All Rights Reserved • [Terms of Use](https://www.zerowait-state.com/blog/how-to-propagate-a-proengineer-attribute-using-oracles-engineering-collaboration/#) • [Privacy Policy](https://www.zerowait-state.com/privacy-policy)